What are Workflows – and why now?
▼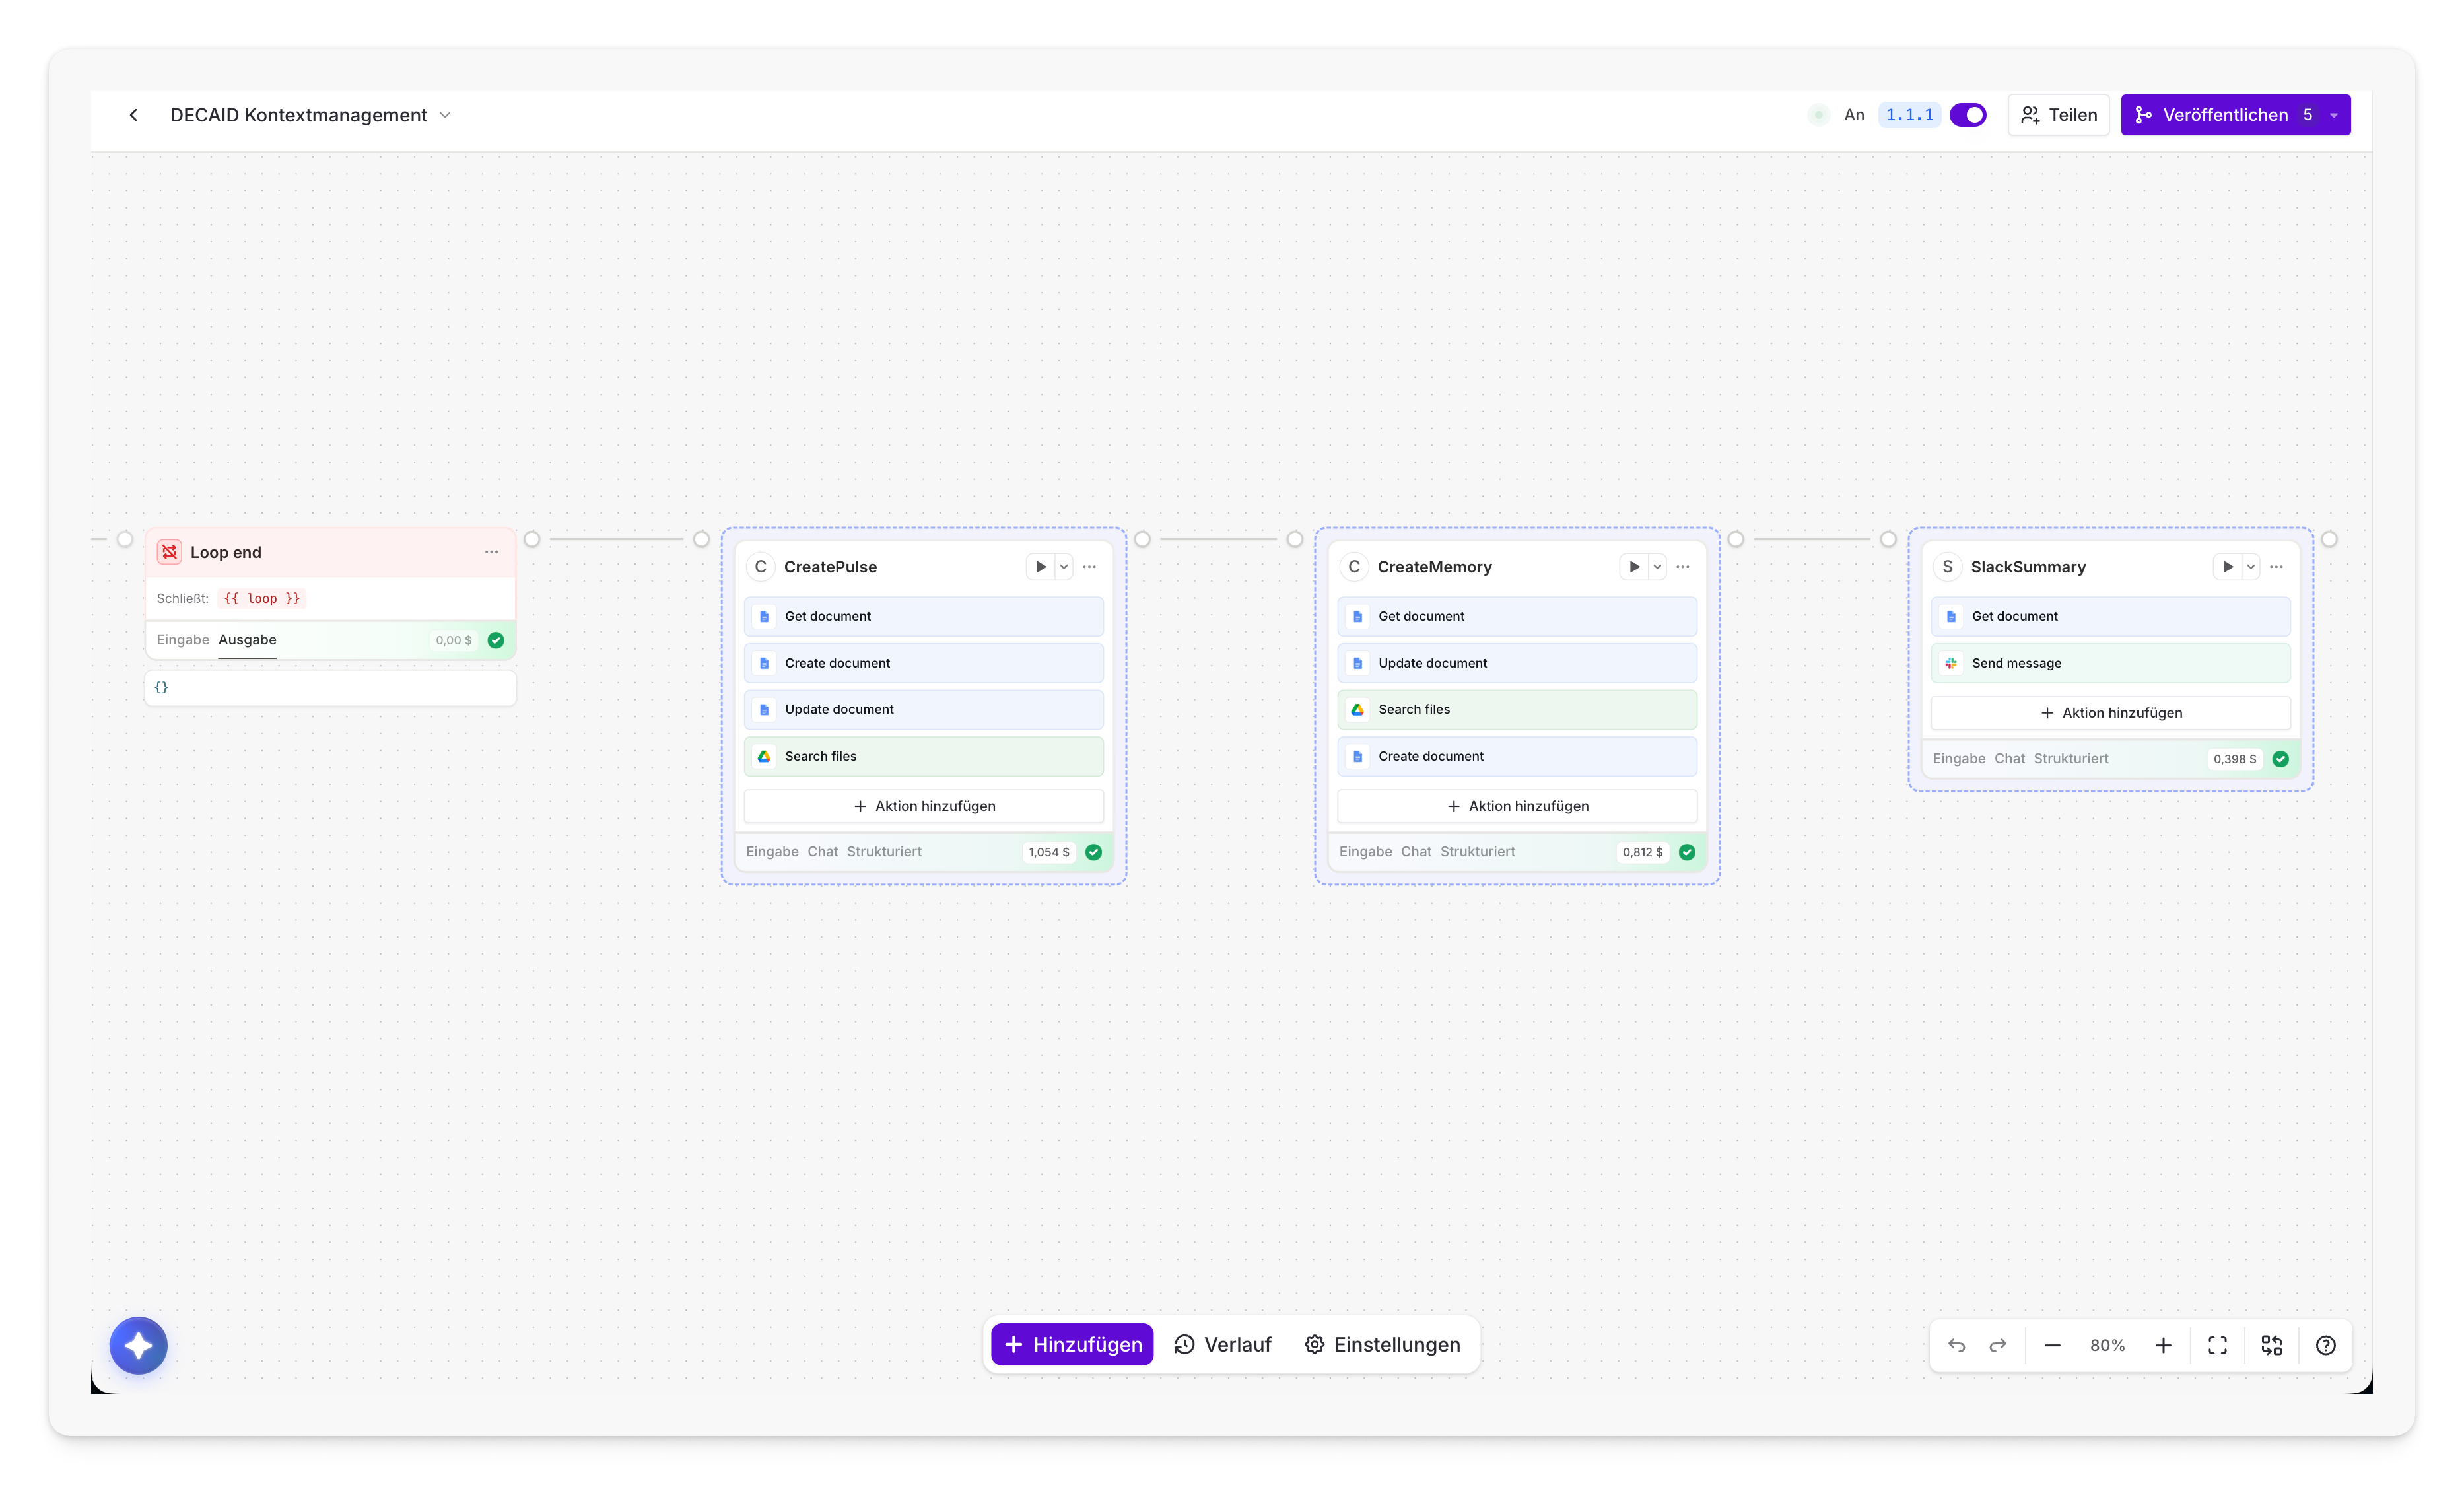
This is what Workflows look like in Langdock: Nodes connected on a visual canvas – no code required.
The Evolution: Chat → Agents → Workflows
You already know Langdock from the Chat and may have built your own Agents. Workflows are the next logical step: instead of manually interacting with AI, you automate entire processes from start to finish.
The difference in one sentence:
- Chat = You ask, AI answers (1:1 dialogue)
- Agents = AI with specialized knowledge and context (configured assistant)
- Workflows = Multiple steps run automatically – with AI, logic, and integrations (end-to-end automation)
When are Workflows worth it?
Workflows make sense when you have a process that is:
- Recurring (e.g., every day, every week, for every new lead)
- Multi-step (receive data → analyze → route → document)
- Not requiring human creativity at its core (routing, categorization, standard communication)
- Error-prone when done manually (forgotten follow-ups, inconsistent categorization)
What Workflows do NOT replace
Workflows are not a substitute for creative work, strategic decisions, or complex case-by-case handling. They take over the repetitive groundwork so your team can focus on what truly matters.
Understanding the Architecture: The Building Blocks
▼What is a Node?
A Node is an individual step in your workflow – think of it as a building block. Each Node has exactly one job: receive data, have AI analyze something, check a condition, send an email, and so on.
Nodes are placed on a visual canvas via drag & drop and connected to each other. No programming required – unless you want to use the Code Node.
Anatomy of a Node
Every Node has:
- Header: Shows the type and name. You will also find the Play button here for testing.
- Input Tab: Shows what data the Node received (after a test run).
- Output Tab: Shows what data the Node produced.
- Configuration Panel: Opens on click – this is where you configure everything.
Connections: How Data Flows
The lines between Nodes are more than just decoration: they determine the execution order and data flow.
- Left (Input): Where execution comes from
- Right (Output): Where execution continues
- Multiple Outputs: Condition Nodes have one output per condition
- Red Output: Special error path (when enabled)
Execution Models
Sequential (Default): Nodes run one after another. Node B waits until Node A is finished.
Parallel: When multiple Nodes are connected to a single output, they run simultaneously. This speeds up your workflow when the steps are independent of each other.
                → Send email →
Trigger →       → Create ticket →        → Continue
                → Update database →
Error Handling
For each Node, you can individually define what happens when an error occurs:
- Stop workflow (Fail): The entire workflow is marked as failed. Best for critical steps.
- Continue workflow (Continue): The error is logged, but the workflow continues. Best for optional steps.
- Error Callback: Execution is redirected via the red error output to other Nodes. Best for fallback logic.
Disabling Nodes
Individual Nodes can be temporarily disabled without deleting them. Disabled Nodes are skipped during execution – ideal for debugging or for optional steps you want to turn off temporarily. You can toggle the status by right-clicking the Node or via the Node menu.
Canvas: Selecting, Copying, Annotating
Past a certain size, a workflow stops being a diagram and becomes a workspace. Two handles turn it back into something readable:
- Select and copy multiple nodes since August 2026: Shift-click selects multiple nodes and copies entire subgraphs – including their connections and layout. A sub-flow you built cleanly once (say Guardrail → Agent → Condition) becomes a building block you duplicate within a workflow or into another one, instead of rebuilding it three times by hand. Rebuilding is the most common source of drift nobody notices.
- Sticky notes since August 2026: You can place sticky notes on the canvas – with Markdown text and colour presets, and without affecting execution. The right home for what nobody else can reconstruct: why the threshold sits at 0.8, who is behind a webhook URL, what still needs cleaning up on the next pass.
Workflows as Building Blocks: One Workflow Calling Another
Nested workflow calls since September 2026: A published workflow can call another published workflow, wait for its result, and then continue. In the editor you pick the callable workflow and map its inputs, exactly as you would with an action.
- Nesting depth of five at most: A called workflow may itself call another, but no more than five levels deep in total.
- Cycle detection is built in: If A calls workflow B and B calls A again, Langdock detects it and prevents the loop. You do not have to keep count yourself.
- It stays visible: Nested runs appear on the canvas, in run history, and in the tables, marked with Called by and Nested in. A failure three levels down can therefore be traced back to the run that started it.
Test Run: Trigger Only or Full Flow
Two buttons instead of a menu since September 2026: The test panel now has two permanently visible buttons instead of hiding the choice in a menu:
- Trigger only: Runs the trigger alone and shows you its output. The right button when you first want to know which fields a webhook or an integration actually delivers, before wiring the downstream nodes to them.
- Full flow: Runs the whole thing end to end. Only worth it once the field names are right, otherwise you pay for agent nodes staring at empty variables.
Workflow Builder Chat
Instead of placing each Node manually, you can create workflows via natural language descriptions. The Workflow Builder Chat (button at the bottom left of the builder) generates a complete workflow from your description.
- Describe workflows: “Create a workflow that generates a weekly report from Google Sheets every Monday and sends it via Slack.”
- Fix in Chat: When errors occur, a button automatically passes error details to the chat – the AI analyzes the problem and suggests corrections.
- Preferences: Configure preferred tools (email, CRM, ticketing) and Custom Instructions via the settings panel.
- JSON import and export: Import existing workflows as
.json– either as a file upload or pasted straight into the chat – and export them again via the three-dot menu next to the workflow name. Ideal for transferring between workspaces. Drop in a file from n8n, Make, or Zapier and Langdock recognises the foreign format and points you to the builder chat: the assistant rebuilds the flow as a Langdock workflow instead of simply rejecting the file. - Chat history: The chat history icon in the top right of the builder takes you back to earlier conversations about this workflow – useful when you return after a few days and want to know why a node is configured the way it is.
- Trigger parameters since June 2026: The assistant now understands the descriptions of trigger input fields, making it significantly more helpful when configuring trigger parameters in the builder.
- Stronger models in the builder chat since July 2026: The workflow chat now also supports Opus and reasoning/thinking models with a dedicated extended-thinking toggle. For complex workflows that the assistant should build from a description or debug, this yields noticeably more thought-through suggestions.
- Your canvas layout survives chat edits since July 2026: The assistant used to rearrange the canvas on every change – anyone who had laid out a workflow deliberately could not find it afterwards. Now existing nodes stay where you put them, and new nodes are placed right next to the node they connect from. If you do want a cleanup, use the Auto Reorder button on the canvas or simply ask the assistant in chat.
- Editor access as a prerequisite since July 2026: The workflow chat only loads a workflow’s draft context once you hold editor rights on it. Anyone with execute-only rights no longer ends up in a half-loaded chat that guesses at the gaps.
- Plain language when a model connection is broken since August 2026: If a model provider connection is misconfigured in the workspace, the workflow chat now says so specifically and tells you what to do, instead of failing generically. That saves you from searching in the wrong place: the problem is not the workflow, it is the workspace settings.
- Responses finish in the background since September 2026: Closing the chat panel while the assistant is still generating no longer cuts the answer short. It finishes rendering and is there in full when you reopen the panel.
- Clear errors on invalid imports since September 2026: When a JSON import fails, a details dialog opens with specific validation messages and copyable error paths pointing at the offending spot in the JSON. Instead of “import failed” you know which node and which field is the problem.
Trigger Types: How Workflows Start
▼Every workflow needs a starting point – the Trigger. It determines when and how your workflow is initiated.
Trigger Types Overview
| Trigger | Initiated by | Typical Use Case |
|---|---|---|
| Manual | Button click | Testing, ad-hoc tasks |
| Form | Form submission | Feedback, requests, applications |
| Webhook | HTTP POST request | External systems, APIs, GitHub |
| Scheduled | Time schedule (cron) | Daily reports, data sync |
| Integration | Event in app | Slack message, new Sheets row |
| From Chat/Agent | @-menu in Chat | On-demand automation from conversations |
Multiple triggers per workflow since September 2026: A workflow is no longer tied to a single entry point. You can attach several triggers to the same flow so that one automation starts from different sources: the invoice workflow on a Gmail trigger for regular operation, plus a manual trigger for the stragglers somebody drops in by hand. That removes the common workaround of building the same flow twice and maintaining it twice from then on.
Manual Trigger
The simplest trigger: a click starts the workflow. Perfect for development and testing. Every new workflow should first be built and tested with a Manual Trigger before switching to an automatic trigger.
Form Trigger
Creates a web form that starts the workflow upon submission. Ideal for collecting data from internal or external users.
Available Field Types:
- Text (single-line), Long Text (multi-line)
- Email, Phone, Number
- Date, Dropdown, Checkbox
- File Upload – since August 2026, structured file fields also accept video uploads
Key Settings:
- Define form title and description
- Mark fields as required
- Configure the “Thank You” message
- Enable public access (for external users)
- Allowed email domains: An Email field can be restricted to one or more domains via Allowed email domains (comma-separated, e.g.
decaid.ai, decaid.studio). Submissions from any other domain are rejected. This is the simplest access control for a public form: the link can circulate freely, but only someone with a company address can submit. It is not authentication – the domain is checked, not verified. - iframe Embedding (since March 2026): Workflow forms can be embedded via
<iframe>into external websites, intranets, or portals – users do not need to leave Langdock. - Result page with file download since August 2026: After submitting a public form, users land on a secure result page where they can view and download any files the workflow generated. That turns the form from a pure intake channel into a complete self-service flow: request a quote, get the PDF back – without anyone sending the file along by hand afterwards.
Webhook Trigger
Provides a unique URL that external systems can call via HTTP POST. The ideal trigger when you want to connect Langdock with your own applications, GitHub, Stripe, or other services.
Auth modes (three variants):
- No auth: URL is publicly accessible. Only for testing or intentionally public endpoints.
- Query parameters: Token is passed as a URL parameter (e.g.
?secret=xyz). Visible in logs, only suitable for internal setups. - X-Webhook-Secret header (recommended): Token in the HTTP header. Doesn't leak into logs or referrers, the clean choice for production.
Payload and files:
The request body may be at most 25 MB – including Base64-encoded file content. Alongside a JSON body and query parameters, the webhook also accepts up to 20 files: a single one under the file key, several under files, each as Base64 (binary) or text. Inside the workflow you access them via {{trigger.output.body.files[0].path}}.
Receiving the raw request body Option: Turning on Preserve raw request body hands the workflow the untouched body – necessary when you want to recompute a provider signature yourself. The price is a smaller limit of 12 MB instead of 25 MB. There is also Include signature headers: it passes through the signature headers from Stripe, GitHub, Slack, DocuSign, Shopify, Svix and Standard Webhooks – in lowercase, which your comparison has to account for. Both switches live under Advanced options and are off by default. Turn them on and headers and rawBody appear in the trigger output; other incoming headers are still left out.
Webhook links can be opened in a browser since September 2026: A webhook can now also be fired by someone opening its URL in a browser. That turns the webhook into a start link you can put behind a button, into a Slack message, or onto an intranet page, without the caller having to be a system. Which is exactly why such a link never belongs in circulation without a secret: whoever has the URL starts the workflow with one click.
Response codes of the endpoint:
| Code | Meaning |
|---|---|
| 202 | Successfully queued, workflow runs in the background |
| 400 | Invalid request format or wrong secret |
| 404 | Workflow not found (wrong ID or not published) |
| 413 | Payload too large – raw body over 12 MB or combined output over 25 MB |
| 429 | Rate limit reached or spend limit exhausted |
| 500 | Server error on the Langdock side |
Useful for debugging: a 429 is almost never a fault in the calling system, but a trigger storm or a spend limit that has been hit – check the workflow's limits before you go looking at the client.
Scheduled Trigger
Runs the workflow automatically at specified times. Perfect for recurring tasks.
Schedule Options:
- Every X minutes
- Hourly / Daily / Weekly / Monthly
- Custom cron expression
- Configurable time zone
Examples:
- Daily sales report at 9:00 AM
- Hourly data sync with external system
- Weekly cleanup task on Sundays
Integration Trigger
Responds to events in connected apps: new Slack message, new email, new file in Google Drive, calendar event, and more.
Supported Integrations (Selection):
- Communication: Slack, Microsoft Teams, Gmail, Outlook Email
- Productivity: Jira, Microsoft SharePoint
- Storage: Google Drive
- CRM: Salesforce, HubSpot, Pipedrive
- Calendar: Google Calendar, Outlook Calendar
- Development: GitHub
- Other: Stripe, Calendly, Ashby, Power BI
Configuration in Three Steps:
- Select the integration
- Choose the event type (e.g., “New message in channel”)
- Configure filters (e.g., only specific channels or keywords)
Failed trigger polls are now visible since July 2026: When an Integration Trigger hits an error while polling the source system – expired connection, rate limit, auth problem – it now surfaces as a failed run with a clear error message in the run history, instead of silently disappearing. That way you notice immediately when a trigger stops firing reliably and don’t have to guess why an expected run never happened.
New trigger sources since July 2026: Microsoft SharePoint adds two new workflow triggers: New item created (a new item in a list or library) and File updated. Document processes can finally start where they originate, instead of being picked up by a scheduled poll. Also new is the Pipedrive integration with six polling triggers covering deals, persons, organizations, activities, leads and notes.
Starting Workflows from Chat and Agents since March 2026
Since March 2026, Workflows can be started directly from Chat conversations and Agent chats – via the @-menu. Type @ in the chat input field and select a workflow from the list.
Ideal for on-demand automations: you are in the middle of a conversation, need an analysis, or want to kick off a process – and you can start the workflow directly without leaving the chat interface.
Two routes into chat
- Directly via the @-menu: Type
@, pick the workflow, send the message. You decide what runs when. - Through an agent: If the workflow is attached to an agent as an action, the agent decides for itself when it needs it – exactly like any other action.
Which triggers work in chat
Only workflows with a Manual, Form, or Scheduled trigger can be started from chat. A scheduled workflow can then also be run on demand, on top of its schedule. Webhook and Integration triggers cannot be called from chat – by definition they wait for an external event. If you want to fire an event-driven workflow manually as well, build a second variant with a Manual or Form trigger.
Confirmation is mandatory
No workflow starts from chat without explicit approval – there is deliberately no auto-execute mode. Manual and Scheduled triggers show a compact panel with Trigger and Decline. Form triggers render their fields inline in the chat, and file fields are pre-populated automatically – multi-file fields with up to 50 of the newest files from the conversation since August 2026, single-file fields with the most recently uploaded one. If a form has several single-file fields, each one gets one of the newest files in upload order. The pre-fill is a suggestion, not a commitment: you can change or clear it before confirming. The chat then shows the run live (“Running …”), followed by status, runtime, and result.
Limits worth knowing
- One workflow per response: A single AI response can trigger exactly one workflow call. Chains of several workflows belong inside the workflow, not in the chat.
- No agent-to-agent workflow calls: Workflows cannot be triggered from agents invoked by a workflow, so nothing can trigger itself recursively.
- Not in the mobile apps: Workflow starts only work on the web.
- Name length: A workflow’s tool name is capped at 63 characters. Very long workflow names get truncated – keep them short and distinctive.
- Access is checked at different moments: With the @-menu, access must be in place at the moment of the call. For agent actions it is only checked at execution time – if access is missing, the user sees an Access Denied message mid-conversation. So attaching a workflow to a shared agent also means releasing it to that agent’s users.
Node Types: What Workflows Can Do
▼Agent Node – AI Analysis & Content Generation
The Agent Node is the centerpiece of most workflows. This is where AI comes into play: analyzing, categorizing, summarizing, generating text, or making decisions.
Two Options:
- Use an existing Agent: Uses an Agent from your workspace with its configuration and knowledge.
- Create a new Agent: Configured and optimized specifically for this workflow.
Structured Output (strongly recommended): Define the exact output format as a JSON schema. This guarantees structured data that downstream Nodes can reliably process.
{
  "sentiment": "negative",
  "category": "bug",
  "priority": "high",
  "summary": "App crashes during image upload"
}
Max Steps: Default: 25. Adjustable depending on task complexity (5-10 for simple tasks, 50-100 for complex research tasks).
Extended Thinking / Reasoning toggle (since May 2026): Extended Thinking can now be enabled directly inside the Agent Node via a simple on/off switch – no separate model variant required. Turn it on only when the task truly needs step-by-step logic (multi-label classification with rationale, routing decisions with several constraints). For standard extraction and simple classification leave it off, that saves tokens and makes the run faster.
Auto Model Mode since May 2026: The Agent Node’s model selector now offers an Auto mode that picks the right model per run based on task complexity – simple classification runs on a small, fast model, complex analysis on a frontier model. Useful when you don’t want to build model routing yourself. For predictable cost and reproducible output, pick an explicit model instead.
Claude Sonnet 5 as the agentic mid-tier model since June 2026: For Agent Nodes that plan, use tools, and work through multiple steps autonomously, Claude Sonnet 5 is often the best pick: the most agentic Sonnet model yet, approaching Claude Opus 4.8 per Langdock while running at a noticeably lower cost. EU-hosted and auto-enabled in workspaces that already ran previous Sonnet versions. Rule of thumb: simple extraction on Haiku 4.5 or Gemini 3.7 Flash, agentic multi-step tasks on Sonnet 5, only the heaviest analyses on the Opus tier.
Claude Opus 5 as the new top tier since July 2026: Claude Opus 5 has been available in Langdock since 24.07.2026 and replaces Opus 4.8 at the top – stronger on complex reasoning and on agentic tasks that have to hold up across many steps. EU-hosted and automatically enabled in workspaces that already ran earlier Opus versions. For Agent Nodes this means: wherever you previously set Opus 4.8 for the hardest cases, Opus 5 is the new default. The rule of thumb does not change – Opus remains the most expensive model in a workflow and does not belong inside a loop that runs a hundred times.
Gemini 3.7 Flash at the cheap end since August 2026: Gemini 3.7 Flash has been available in Langdock since 17.08.2026 and replaces Gemini 3.5 Flash as the current Flash model – per Langdock, Google’s most capable Flash model yet for coding and agentic work, with gains in software engineering, web development, and knowledge work. EU-hosted and automatically enabled in workspaces that already ran earlier Gemini versions. For workflows this is the most interesting tier of all: exactly the nodes that run hundreds of times inside loops get a better model at the Flash price.
Available Tools:
- Web Search (for up-to-date information)
- Code Execution (sandboxed Python)
- Integration Actions (optionally with Human Confirmation)
- Knowledge Folder (access to company knowledge)
- Nested Agent Calls (call other Agents)
Prompt Engineering Tips:
- Be explicit: “Categorize as Bug, Feature Request, or Question” rather than just “Analyze the text”
- Provide context: Explain the role and background
- Use examples: Show the Agent what the desired output should look like
- Constrain the output: “Reply ONLY with one of the following categories: ...”
Condition Node – Conditional Logic
Routes workflow execution based on conditions. Each condition has its own output path.
Typical Use Cases:
- Check priority:
{{agent.output.structured.priority === "high"}} - Check amount:
{{trigger.output.amount > 5000}} - Check status:
{{customer.output.status != "inactive"}}
Available operators (Manual Mode): comparison (===, !==, >, <, >=, <=), logical (&&, ||, !), string methods (.includes(), .startsWith(), .endsWith()). Operators can be combined: {{trigger.output.score > 80 && agent.output.verified === true}}.
Modes & toggles: By default the first matching condition fires and the rest are skipped. With Allow multiple conditions every matching branch runs in parallel. In Prompt AI mode you phrase conditions in natural language; Force Select Branch guarantees that at least one branch is always chosen, even when no match is obvious.
New (June 2026): Condition rows now show the branch name first. Renamed branches stay clearly labeled even in prompt mode – making it easier to keep your bearings in heavily branched workflows.
Code Node – Custom JavaScript
For data transformations, calculations, and custom logic that does not require AI.
Perfect for:
- Mathematical calculations
- Reformatting data
- Parsing and manipulating JSON
- Data validation and cleansing
- Date/time operations
const scores = agent.scores || [];
const average = scores.reduce((a, b) => a + b, 0) / scores.length;

return {
  average_score: average.toFixed(2),
  highest_score: Math.max(...scores),
  grade: average >= 90 ? "A" : average >= 80 ? "B" : "C"
};
Available functions (JavaScript sandbox):
ld.request()– Execute HTTP requestsld.awsRequest()– SigV4-signed requests to AWS services (S3, API Gateway)ld.log()– Output debug informationld.wait()– Pause execution (0–30,000 milliseconds)- Data conversions:
ld.csv2parquet(),ld.parquet2csv(),ld.arrow2parquet(),ld.json2csv() - SQL checks:
ld.validateSqlQuery()(syntax of a single statement) andld.ensureReadOnlySqlQuery()(enforces read-only) ld.signWithRS256()– RSA-SHA256 signatures for JWT signing and OAuth- Global helpers:
atob()/btoa()(Base64),Buffer.from()(accepts Array, Uint8Array, or ArrayBuffer only),FormData(multipart uploads) - Standard JavaScript (JSON, Date, Math, RegExp, Array, Object)
The same ld.* utilities are also available in custom integrations – in actions, triggers, and auth flows.
Limits for custom actions: An action from a custom integration processes at most 20 files totalling 100 MB per call – individual images up to 20 MB, spreadsheets and videos up to 100 MB, documents and audio up to 256 and 200 MB respectively, always bounded by the 100 MB total. Execution times out after 2 minutes. The size check runs before your code starts: oversized attachments fail immediately with a clear error instead of halfway through.
Python sandbox (alternative to JavaScript): Python runs without internet access and without the ld.* utilities, but ships with pre-installed libraries: pandas, numpy, openpyxl, pypdf. Generated files appear under _files in the output object. Useful for tabular analysis, Excel generation, and PDF parsing.
HTTP Request Node – External APIs
Call any external API: retrieve, create, update, or delete data.
Methods: GET, POST, PUT, PATCH, DELETE
Pro Feature: Import from cURL – Paste a cURL command from an API documentation, and all fields (URL, headers, parameters) are automatically populated.
Configuration:
- URL: Supports variables, e.g.,
https://api.example.com/users/{{trigger.output.user_id}} - Headers: Key-value pairs for auth, content type, etc.
- Query Parameters: Cleaner than hardcoding them in the URL
- Body: JSON with variables (for POST/PUT/PATCH)
Using the Response:
{{http_node.output.status}}          → Status code (200, 404, etc.)
{{http_node.output.data}}             → Response body
{{http_node.output.data.user.name}} → Nested fieldFile Search Node – Search Company Knowledge
Searches your Knowledge Folders and returns the most relevant results. Ideal for RAG patterns (Retrieval Augmented Generation).
Configuration:
- Select a Knowledge Folder
- Define the search query (Manual, Auto, or AI Prompt)
- Set max results (default: 10)
What a Knowledge Folder accepts: Searchable formats are text based – PDFs, Word documents, Markdown and presentations. Knowledge Folders do not accept tabular files (Excel, CSV), images, audio or video. If your workflow needs that kind of data, pull it from the source system via an Action or process it in a Code Node – this is the most common explanation for a file that “sits in the folder” yet never shows up as a result.
Recommendations for Max Results:
- 1-3: Focused, specific queries
- 5-10: When broader context is needed
- 10+: Comprehensive searches (may impact performance)
{{file_search.output.results}}                  → All results
{{file_search.output.results[0].text}}          → Text of the most relevant chunk
{{file_search.output.results[0].similarity}}    → Relevance score (0–1)
{{file_search.output.results[0].fileName}}      → File name
{{file_search.output.results[0].fileUrl}}       → URL to the source file
{{file_search.output.results[0].mimeType}}      → File format (e.g. application/pdf)
{{file_search.output.results[0].fileId}}        → Internal file ID
{{file_search.output.results[0].externalId}}    → ID in the connected source system
{{file_search.output.results[0].connectionId}}  → ID of the integration connection
{{file_search.output.results[0].fileSize}}      → File size in bytes
{{file_search.output.results[0].pageCount}}     → Number of pages
{{file_search.output.results[0].subsource}}     → Source system of the hit (e.g. sharepoint)
{{file_search.output.results[0].subname}}       → Name of the specific source (e.g. site or drive)
{{file_search.output.results[0].syncParams}}    → Sync parameters of the source
Richer file metadata (since May 2026): File Search nodes and folder tools now also return fileId, externalId, connectionId, fileSize, and pageCount, plus subsource, subname, and syncParams. Use these to deduplicate hits, deep-link back into the source system, and filter by size or page count before passing chunks into an Agent. subsource and subname are the quickest way to forward only the hits from one particular source in a mixed knowledge folder. since July 2026 SharePoint page links (.aspx) in Search Files results now resolve correctly as attachments – so the actual page content lands in the workflow instead of just a dead link.
Faster sync on large folders since August 2026: SharePoint, OneDrive, and Google Drive now use a dedicated metadata action to detect unchanged files during sync, instead of reprocessing them. Folder sync runs noticeably faster and more efficiently as a result. In practice: a freshly filed document is available to the File Search node sooner, especially in folders where only a handful of files change per day.
Web Search Node – Search the Internet
Searches the internet and delivers up-to-date information. Perfect for fact-checking, market research, or rapidly changing data.
Modes:
- Automatic: AI generates the optimal search query
- Manual: You specify the exact search terms
- Prompt: Instructions from which the AI generates a query
Action Node – Take Action in Connected Apps
Performs actions in connected integrations: send Slack messages, update Google Sheets, create Jira tickets, send emails.
Examples by Integration:
- Slack: Send message, send DM, create channel
- Google Sheets: Add row, update row, modify cell
- Gmail: Send email, create draft, add label
- Notion: Create page, update database entry
- CRM: Create contact/deal, log activity
New action sources since July 2026: Pipedrive has joined with 46 actions – deals, persons, organizations, activities, leads, notes, pipelines and stages. And the Langdock API itself gained 14 new actions that let a workflow manage agents, skills, knowledge folders and integrations. That opens up operational tasks that used to be manual admin work: refilling a knowledge folder after a quarterly rollover, rolling a skill update out to several agents, cleaning up orphaned integrations.
Automatic tool search since July 2026: Agent Nodes can optionally be configured so the AI finds suitable integration actions on its own, instead of you enabling them one by one up front. This is deliberately opt-in: it makes exploratory agents far more useful, but it softens the boundary of which actions a workflow can touch at all. For production workflows with write access, explicit selection remains the safer option.
MCP Servers as an Additional Action Source
Besides the native integrations, you can connect your own MCP servers and use their tools inside a workflow. Four authentication methods are available: no auth (public servers), API key (with a selectable header format such as X-API-Key, Bearer or Basic), OAuth (OAuth 2.0 with DCR support) and Advanced OAuth (OAuth 2.0 without DCR).
- Forwarding the login token since July 2026: On dedicated deployments with user OAuth login enabled, you can use the
{{ user_oauth_access_token }}placeholder. The MCP server then sees the executing user’s login token and can act on their behalf – permissions stay with the person instead of hanging off a shared service account. - Controlling the resource parameter: With Advanced OAuth, the Send resource parameter option decides whether Langdock passes the MCP server URL as the OAuth
resourceparameter. Leaving it enabled is the normal case; disable it for servers that already carry the resource in the scope – Entra ID, for example. - Narrowed resource access since July 2026: MCP resources are only read through explicitly enabled URI actions. A server can no longer browse its resources more broadly than you permitted.
- Confirmation is opt-in: Newly saved MCP tools and resources run without a confirmation dialog. For anything that writes or moves money, enable confirmation per tool by hand after saving.
- Up to 60 tools and 50 resources since August 2026: Each MCP integration supports 60 enabled tools and 50 resources – the cap sat at 50 before that. The number is still not a target: every enabled tool sits in the picker and can be grabbed by an Agent Node. The longer the list, the more often the model picks the wrong one. Enable what the workflow needs, not what the server offers.
- MCP App actions clearly labelled since August 2026: The integration details dialog now shows the app tag and resource URI for MCP App actions. With several servers connected and similarly named tools, you can see at a glance which tool from which app is actually in front of you – the mix-up surfaces before rollout, not after.
- OAuth challenges mid-operation since August 2026: Servers that ask for an OAuth grant on an already active connection – seen with Linear, Canva, and Notion – now complete OAuth discovery cleanly instead of stalling with an unclear error.
Risk level at a glance since August 2026: The integration directory now lists public integrations alongside your own custom ones, each with its risk level displayed. Before you wire a third-party integration into a production workflow, that is the first thing worth checking.
Large responses get truncated – and now say so since June 2026: When an integration returns a very large response, Langdock truncates it and flags this explicitly in the output. That is more than cosmetic: if a downstream Agent Node works on a truncated list, it draws conclusions from partial data without noticing. When you see the notice, use filters or pagination in the action – or iterate over subsets with a Loop Node instead of pulling everything at once.
Image Generation Node – Generate Images
Generates images from text prompts directly within the workflow. Ideal for marketing assets, social media content, or dynamic visualizations.
Configuration:
- Prompt: Text description of the desired image (Manual, Auto, or AI Prompt Mode). Supports variables, e.g.,
A {{trigger.output.style}} image of {{agent.output.structured.subject}} - Image Model: Two models involved – an LLM optimizes the prompt, an image model generates the image. In Manual Mode, only the image model is used. Available options include GPT Image 2 (since April 2026, up to 2K resolution) and Stable Diffusion – the exact model list depends on your workspace configuration.
- GPT-Image 2.5 since 11 September 2026: OpenAI's new image generation comes in two variants. Flare is the default model, with gains in image quality, editing and speed; Sunburst is the premium tier for control and precision. Both are EU-hosted. Workspaces that already had GPT Image 2 enabled get Flare automatically; admins enable Sunburst in workspace settings. For workflows this means: Flare is the new default for batch generation inside a loop, Sunburst only pays off where a single image really has to land.
- Aspect Ratio: Square (1:1, social media/profile pictures), Landscape (16:9, presentations/banners), Portrait (9:16, stories/mobile)
- Style Presets: Auto, Photorealistic, Digital Art, Oil Painting, Watercolor, Sketch, Anime, 3D Render, Minimalist, Cinematic
Output:
| Field | Description |
|---|---|
{{image_gen.output.imageUrl}} | URL to the generated image (valid for 7 days) |
{{image_gen.output.imagePath}} | File path |
{{image_gen.output.attachmentId}} | Attachment ID for further processing |
{{image_gen.output.prompt}} | The prompt that was actually used |
{{image_gen.output.aspectRatio}} | Selected aspect ratio |
Limits: Timeout 60 seconds, PNG format only, no image-to-image function, URL validity 7 days.
Further Processing: Agent Node (image analysis), Action Node (share via Slack/email), HTTP Request (upload to external server), Loop Node (batch generation of multiple images).
Loop Node – Iterate Over Lists
Processes arrays of data: iterate through a list of customers, orders, or files and apply the same logic to each element.
Configuration:
- Input Array: The array to iterate over (e.g.,
{{trigger.output.customers}}) - Max Iterations: Safety limit (default: 200, maximum: 2,000)
- Concurrency: Off (sequential, default) or On (parallel – faster for independent iterations, ordering then not guaranteed)
- Collect Outputs: Aggregates all iterations into an output object with
iterations(array of index, item data and execution details) andtotal(count). Lets downstream nodes access every result in one place. - Resume after a failure since September 2026: If a sequential loop breaks partway through the list, the run no longer has to start over. You resume it from the next iteration, and the results already completed are kept. On expensive loops with agent nodes that is real money: 180 processed records are not paid for a second time because of number 181. It does not apply when concurrency is on, where the order is not guaranteed anyway.
{{loop_node.output.currentItem}}        → the current data object
{{loop_node.output.currentItem.name}}   → nested access
{{loop_node.output.currentIndex}}       → current position (0-based)
{{loop_node.output.total}} → total countLoops with Agent Nodes can get expensive. 100 elements × €0.10 per Agent call = €10 per workflow run. Calculate costs beforehand and set a realistic max iterations limit.
Delay Node – Add a Pause
Pauses the workflow execution for a defined duration (1 second to 24 hours).
Typical Use Cases:
- API polling (regularly check whether a process is complete)
- Rate limiting (avoid API throttling)
- Retry logic with backoff
Send Notification Node – Notifications
Sends alerts directly to your Langdock inbox. Supports Markdown formatting and variables.
Recipients: For manually/form-triggered workflows, the triggering user; for scheduled/webhook/integration workflows, the workflow creator. For external recipients, use the Action Node with Slack, Gmail, etc.
Input Modes: Manual (direct message), Auto (AI generates based on context), or Prompt AI (custom AI instructions).
Good notifications include:
- Clear heading with priority
- Relevant data (name, ID, category)
- A concrete next step (“Please respond within 1 hour”)
Output Node – Store & Display Results
The Output Node is a workflow’s endpoint. It stores a resolved value as the workflow run’s result – visible in the run history, via the API, and directly in chat.
Especially important for chat integration: When a workflow is triggered from chat, the output appears as a formatted result panel directly in the conversation – showing the workflow name, execution time, and content.
Configuration:
- Value Field: Template expression with variables from previous nodes (Manual mode only)
- Slug: Auto-generated camelCase identifier – must be unique when using multiple Output Nodes
- Multiple Outputs: A workflow can contain multiple Output Nodes, each contributing separate keys to the result object
- Model selection in Auto and AI Prompt mode since August 2026: If you run the Output Node in Auto or AI Prompt mode, a model phrases the value – and there is now a dedicated model picker on the node itself. Leave it empty and the builder warns you. Use it: plain summarising runs fine on a cheaper model, and the Output Node is one of the places where that pays off without any loss of quality.
Generated files land directly in chat since July 2026: Files a workflow produces along the way – a report from the Code Node, an image from the Image Generation Node, an export from an action – now appear right in the chat result instead of sitting in the run history only. So whoever starts the workflow from chat via the @ menu can open and use the result immediately. You no longer need a detour – storing it in Drive, putting the link in an Output Node – to make the file visible.
// Single output
{{output_node.output.value}}

// Example: Summary as output
Value: "{{agent.output.structured.summary}}"

// Example: Combined data
Value: "Report for {{trigger.output.customer_name}}: {{agent.output.structured.analysis}}"Variables & Data Flow
▼The Core Principle
Variables are the nervous system of your workflow. When a Node finishes, its output becomes available as a variable – and all downstream Nodes can access it.
Syntax
{{node_name.output.field_name}}Breakdown:
node_name= The unique name of your Node (e.g.,form1,analyze_data)output= The standard output object of every Nodefield_name= The specific data field
Nested Data
Real-world data is rarely flat. Use dot notation for nested access:
{{node.output.user.profile.email}}           → Nested object
{{api_response.output.data.items[0].title}}  → Array element
{{trigger.output.tags}}                       → Entire array
{{agent.output.structured.summary}}           → Structured Output
Optional Chaining: reaching fields that may be missing
A question mark before the dot accesses a property safely, even when it may not exist at all. If any link in the chain is missing or null, the whole expression returns undefined instead of failing the Node with an error.
{{trigger.output.user?.email}}                 → Field may be absent
{{agent.output.structured?.priority}}          → Structured Output without a fixed schema
{{http_request.output.data?.items?.[0]?.name}} → Chain including array accessUsing Autocomplete
Where a field supports it, there is also the Output Selector: instead of typing the path, you click through the outputs of previous Nodes and pick the field. That is the safe route for deeply nested structures, where a typo in the path would otherwise only surface at runtime.
Reusing Variables
An output can be used in any number of downstream Nodes:
Trigger (form1) →
  ├─ Agent (analyze {{form1.output.message}})
  ├─ HTTP Request (log {{form1.output.email}})
  └─ Notification (notify about {{form1.output.priority}})
Combining Variables
Mix data from different Nodes in a single field:
New order #{{trigger.output.order_id}} from {{customer.output.name}} for {{trigger.output.amount}} €Renaming Nodes
When you rename a Node, all variable references are automatically updated – no manual cleanup needed. That is why you should give Nodes descriptive names from the start:
- ✔
AnalyzeFeedback,CheckPriority,NotifySlack - ✘
agent1,condition2,action3
Field Modes: Auto, Manual & AI Prompt
▼Every configuration field in a Node can operate in one of three modes. Choosing the right one directly impacts quality, cost, and control.
Auto Mode
The AI automatically determines the appropriate value based on the context of previous Nodes.
| Pros | Quick setup, very flexible, covers edge cases |
| Cons | Consumes AI credits, less control, can get expensive with frequent execution |
| Ideal for | Simple data mapping when the context is obvious |
Manual Mode
You enter exact values or reference variables – no AI processing.
| Pros | Full control, no AI credits, fastest execution, predictable |
| Cons | Manual effort, no dynamic content |
| Ideal for | Fixed values (API keys, email addresses), exact variable references, templates |
Field: "Email Subject"
Mode: Manual
Value: "New order #{{trigger.output.order_id}} from {{trigger.output.customer_name}}"
Result: "New order #12345 from John Smith"
AI Prompt Mode
Natural language instructions from which the AI generates dynamic content.
| Pros | Intelligent, context-aware content, saves template work |
| Cons | Consumes AI credits, slower, output may vary |
| Ideal for | Email copy, summaries, dynamic messages |
Field: "Email Body"
Mode: AI Prompt
Instruction: "Write a friendly 2-paragraph response to {{trigger.message}}
that addresses the issue {{agent.issue_category}} and offers a solution."
Action Fields Now Default to Manual Mode since July 2026
In Action Nodes, fields that an AI could fill now default to Manual. If you deliberately switch such a field to Auto or AI Prompt, Langdock shows a security warning.
The reasoning matters: an AI-filled field in an action is an attack surface. When the content of an incoming email, form submission or Slack message flows into the context, that text can carry instructions the AI reads and follows (prompt injection). If the recipient field of a “send email” action is set to Auto, the attacker effectively decides who receives the mail.
Fields that determine where or to whom something goes (recipient, channel, target URL, file path, SQL or search query) belong in Manual Mode – even when Auto would be more convenient. Give the AI freedom over the content, never over the destination.
None: leaving a field out on purpose
On Action Nodes there is a fourth state alongside the three modes: None. It skips an optional field entirely instead of filling it with an empty string. The difference matters in practice: an empty string can overwrite an existing value in the target system, whereas a skipped field never reaches the action at all and the target value stays untouched.
Decision Tree: Which Mode?
Do you need the (optional) field at all?
└─ No → None (skip the field)

Is the value always the same?
└─ Yes → Manual Mode (static text)

Does the value come unchanged from a previous Node?
└─ Yes → Manual Mode (with variables)

Does AI need to generate or transform the content?
├─ Yes → AI Prompt Mode
└─ No → Auto Mode (only for simple mapping)Guardrails & Security
▼The Guardrails Node validates content with AI-powered checks – before it reaches customers, gets saved, or is published.
Available Guardrails
PII Detection (Personally Identifiable Information)
Detects names, email addresses, phone numbers, addresses, credit card numbers, etc.
- Recommended threshold: 0.7–0.8
- Use case: GDPR compliance, before data is shared externally
Moderation
Checks for inappropriate, harmful, or offensive content.
- Recommended threshold: 0.6
- Use case: User-generated content, public communication
Jailbreak Detection
Detects attempts to bypass AI safety controls.
- Recommended threshold: 0.7
- Use case: Publicly accessible AI interfaces, validating user prompts
Hallucination Detection
Detects when AI-generated content contains false or unverifiable information.
- Recommended threshold: 0.6–0.7
- Use case: Fact-based content generation, customer communication
Custom Evaluation
Define your own validation criteria in natural language.
- Use case: Check brand voice, domain-specific rules, custom quality standards
Criteria: "Check whether the response matches our brand voice:
- Professional but friendly tone
- No jargon or abbreviations
- Customer is addressed by name
- Clear next steps are provided"
Setting Thresholds Correctly
| Threshold | Behavior | Use Case |
|---|---|---|
| 0.3–0.5 | Lenient | Avoiding false positives |
| 0.6–0.7 | Balanced | Most use cases |
| 0.8–0.9 | Strict | High-risk scenarios |
| 0.9–1.0 | Very strict | Only obvious violations |
Combining Multiple Guardrails
In practice, multiple guardrails are often enabled in a single Node. A typical combination: PII Detection + Moderation + Custom Evaluation for brand voice.
Connections: whose permissions a workflow acts with
Guardrails check the content. The second, frequently overlooked security question is: whose access rights does an Action Node actually use? A connection is a saved authentication link between Langdock and an external tool – and it always belongs to the person who created it. Every action runs with that person’s rights, not with those of whoever triggers the workflow.
That is why a workflow comes up empty for a colleague even though it works for you: it is simply looking at a different mailbox, a different drive, a different CRM.
What can be shared – and what cannot
- OAuth connections (Google, Microsoft 365, Slack, HubSpot) cannot be shared directly. An OAuth token represents one specific person’s consent; passing it on would destroy accountability and violate the providers’ terms.
- API key, service account, and no-auth connections, by contrast, can be shared with individual users, groups, workspace API keys, or the entire workspace (admin path: Integrations → connection actions menu → Share connection).
- The route that works for every auth type: the preselected connection. When configuring an action you specify that all users should use the same, fixed connection. Colleagues then run the action without ever seeing the credentials – the clean pattern for shared calendars, a central CRM account, or a team Slack bot.
Which connection applies?
If someone holds several connections to the same service, Langdock picks in this order: 1. the connection preselected on the action, 2. the user’s default connection for that integration, 3. ask the user. In an unattended workflow, option 3 is no option at all – always set a preselected connection there.
Reauthorization
Langdock prompts for reauthorization when an OAuth connection expires, is revoked, lacks required scopes, or when an admin removes the underlying OAuth client. To do it manually: Integrations → select the integration → connection actions menu → Reauthorize. For scheduled workflows this is the single most common cause of silent failures: the schedule fires, the connection is dead, and nobody is watching.
Custom OAuth clients since August 2026
Admins can now register multiple custom OAuth clients per integration: one workspace-wide default plus separate clients for specific groups. A matching group client takes priority over the workspace setting, and once a connection is established it stays tied to its original client even if group membership changes later. Running your own client also allows you to request application-level scopes – these work independently of any individual user’s rights and therefore belong only where they are genuinely needed.
Security controls: two node types an admin can switch off
Under Settings → Workflows there are two workspace-wide toggles that govern entire node types rather than individual fields. Both are on by default:
| Toggle | What it blocks | When it makes sense |
|---|---|---|
| Code Node | Code nodes can no longer be added to new workflows | No-code policy in the team, compliance requirements, restricting builders to vetted building blocks |
| HTTP Request Node | HTTP Request nodes can no longer be added to new workflows | Keeping outbound calls inside approved integrations instead of allowing arbitrary endpoints |
Action-level scopes: why an enabled action can still fail
Every integration action depends on one or more OAuth scopes from the provider – an Outlook Calendar action may need Calendars.ReadWrite, for example. Admins control this under Integrations settings → integration → Scopes and Action Access, either in Scope view (which scope groups are requested) or Action view (action by action, with the scopes each one needs).
- Langdock Client (default): Requested scopes stay in sync with enabled and shared actions automatically. Enable an action with a missing scope and the scope is added after you confirm; disable it and the scope drops off, provided no other action still needs it.
- Custom OAuth client with Sync scopes with enabled actions: behaves exactly like the Langdock Client.
- Custom OAuth client with fixed scopes: You maintain the list yourself. An action carrying the Missing scope badge can be switched on, but it will not run until the scope is added to the client. It looks enabled in the UI and still fails inside the workflow – an error that is hard to read without this background.
- New actions enabled by default: Set to On, newly added actions turn active automatically as long as their scopes are already requested. Set to Off, they stay disabled until someone reviews them. A new scope never silently widens what Langdock requests from your provider.
- Actions grouped by effect since September 2026: An integration's action list is now sorted by type: View (read only), Change (writes or modifies) and Delete (removes). When granting access you see at a glance what you are allowing, without reading every action one by one. For the approval conversation with IT and the works council this is the most useful sorting there is: View is rarely contested, the debate is about Change and Delete.
Expired connections now speak up since September 2026: An expired or revoked connection used to surface only when someone missed the results. Now Langdock notifies a workflow's editors when a completed run hit an unavailable or expired connection. The run counts as finished, the result is incomplete, and that exact combination was invisible before.
Human in the Loop: When Humans Decide
▼For sensitive actions, you can add a manual approval step. The workflow pauses and waits for approval from users with editor access.
Process
- Workflow reaches the approval step
- Users with editor access receive a notification
- A reviewer checks the details and approves (or rejects)
- Workflow continues
When is it appropriate?
- ✔ Financial transactions above a threshold
- ✔ Irreversible actions (data deletion, contract dispatch)
- ✔ Customer communication that requires quality review
- ✔ Production changes with risk potential
When is it NOT appropriate?
- ✘ Routine actions with low risk
- ✘ Steps that need to be executed immediately
- ✘ High-frequency actions (will become a bottleneck)
Confirmation Dialogs for Write Actions
Alongside the explicit approval step there is a second, more fine-grained layer: write actions (send email, write to Google Docs, create a HubSpot record, open a Jira ticket) ask for confirmation before they run and show exactly what is about to be written.
- Optional fields in the dialog since July 2026: You can now add or remove optional fields directly in the confirmation dialog instead of cancelling and reconfiguring the node. Whoever approves can refine the record in the same step.
- Markdown in the dialog since August 2026: Confirmation fields with text content now render Markdown formatting instead of showing the raw characters. Whoever approves reads a table as a table and a list as a list – and is less likely to miss what is actually buried in a thicket of asterisks and pipes.
- Editing values directly in the JSON proposal since September 2026: When a run is waiting on an action approval, you can click a value in the JSON proposal and edit it in place before approving. The action then runs with your correction. The typical case: the agent found the right email address but phrased the subject line unusably. That used to mean reject, adjust the node, rerun; now it is two clicks.
- Controllable via API since July 2026: The integrations API exposes the
requiresConfirmationflag. If you build your own integrations, you decide per action whether it triggers a confirmation dialog – useful when connecting in-house systems where harmless reads and sensitive writes need different treatment.
A rule of thumb for telling the two apart: the confirmation dialog safeguards the individual action, the approval step safeguards the decision behind it. For scheduled workflows running without an audience, the approval step is the right tool – nobody is around at night to click a dialog.
Smart Approval with Conditions
Combine Conditions with Human in the Loop to require approval only when needed:
Agent: Calculate invoice amount

Condition: Amount > €5,000?
├─ Yes → Approval: Review payment → Execute payment
└─ No → Execute payment directly
This gives you automation for routine cases and control for exceptions.
Versioning & Deployment
▼Draft Version (v0)
Your sandbox for experimentation. Changes here have no impact on production. Test thoroughly before you publish.
Auto-Save & Change Summaries since April 2026: Drafts now save automatically – no more “Save” click required. On publish, Langdock proposes a Change Summary (which nodes/fields changed since the previous version). The summary lands in the version history and makes later rollback decisions easier to reason about. since June 2026 Even simply renaming a node is now correctly recognized as a change – the deploy panel displays the diff properly and lets you publish it.
Invalid connections are cleaned up automatically since July 2026: Before every save, deploy or restore, Langdock removes connections that lead nowhere – for example an edge left dangling after its target node was deleted. Previously such edges could block a deployment or leave a restored version in a broken state.
Published Versions
When you are satisfied, you create a new version (v1.0.0, v1.1.0, etc.). Published versions are:
- Immutable: Cannot be edited anymore
- Active for Triggers: Only active versions respond to real events
- Documented: Each version has a description of changes
- Rollback-capable: You can reactivate an older version at any time
Version Numbers (Semantic Versioning)
| Bump Type | Example | When? |
|---|---|---|
| Patch | 1.0.0 → 1.0.1 | Bug fixes, minor adjustments |
| Minor | 1.0.0 → 1.1.0 | New features or Nodes |
| Major | 1.0.0 → 2.0.0 | Breaking changes |
Workflow Status
| Status | Meaning |
|---|---|
| Not deployed | Being built – no triggers active |
| On | Published and responding to triggers |
| Off | Exists but temporarily deactivated |
Workflow Monitor: The Operations View
Monitor tab for everyone since September 2026: A published workflow needs a place where somebody can see whether it still does what it should. That place is the Monitor tab on the Workflows home page, and since September 2026 it is open to everyone, not just admins.
What the Monitor shows
- Health KPIs and failure sources: A health summary at the top, plus failure source badges. Internal platform errors are labelled Platform issue, so nobody spends an evening hunting through their own workflow for a fault that is not there.
- Top failing nodes: A table of the nodes that break most often. The fastest route from “something is stuck” to a specific place.
- 30-day success rate per workflow: Every workflow row carries its success rate for the last 30 days. A workflow sliding from 94% to 71% stands out before anyone complains.
- Per-section filters: Each section can be narrowed by workflow and time range, including the Runs by day chart.
- Run tags: Runs can be filtered by tag in Run History, so you find the ones you care about among thousands of entries.
- Action required: Pending approvals and agent inputs sit here together and can be approved or rejected directly. An approval step no longer depends on somebody happening to notice the notification.
- Broken connections before the run: The Monitor surfaces invalid connections before a run fails on them and lets you reconnect in place. An expired OAuth token shows up while you are looking, not in tomorrow morning's failure email.
- Successful retries: A failed run that was later healed by a rerun carries a Successful retry indicator linking to the run that fixed it. Retry chains point back the other way, to the original failing run.
- CSV export of run history: Run history can be exported as CSV. For deeper analysis (failure rate per node, runtimes, patterns across months) the Workflow Run Export API remains the more precise tool, see chapter 13.
Notifications
Failed runs of published workflows and exhausted spend limits now also reach selected recipients through the Langdock inbox, not only by email. Consecutive failures are grouped: at most one alert per hour. A quiet inbox is therefore no proof that things are running again. The reliable source stays the Monitor.
The workspace view for admins
Workspace workflow management is a sortable table with name, owner, status, run count, cost, last run and updated date. Handy for two recurring questions: which workflow is eating the budget, and which one has had no owner paying attention for weeks because that person left the company.
Cost Management
▼Where Do Costs Arise?
- Agent Nodes: Consume AI credits based on model and token volume
- Auto Mode Fields: Use AI in the background → AI credits
- AI Prompt Mode Fields: Use AI for content generation → AI credits
- Web Search: Cost per search
- Loops: Multiply costs per element
Cost Driver #1: Loops with Agent Nodes
The most common cost trap: a loop over 100 elements with one Agent call per element.
Calculation: 100 elements × €0.10 Agent cost = €10 per workflow run
With daily execution: €300 per month – just for this one workflow.
Loops with Agent Nodes can quickly get expensive. Always calculate the expected monthly costs before going live: cost per run × expected runs per day × 30.
Strategies to Reduce Costs:
- Batching: Instead of 100 individual Agent calls → group elements into batches of 10
- Cheaper models: Not every task requires a flagship model like GPT-5.6 Sol or Claude Opus 5 (the strongest Opus model in Langdock since July 2026) – for simple categorization Haiku 4.5, GPT-5.6 Luna (the cost-efficient variant of the GPT-5.6 family, EU-hosted since July 2026 and automatically available in workspaces where GPT-5.5 was active) or Gemini 3.7 Flash (the current Flash model since August 2026, optional Thinking toggle for more complex cases) is often enough. For agentic multi-step tasks, Claude Sonnet 5 (since June 2026) is the sweet spot: close to the Opus tier but noticeably cheaper – reserve Opus 5 for the heaviest analyses only
- Manual instead of Auto Mode: Fixed values and simple variable references cost nothing
- Conditions before Agent Nodes: Filter out irrelevant data before it reaches the expensive Agent
Monitoring Costs
- Check the Usage Tab after every test run
- Set Spending Limits in the workflow settings
- Calculate expected monthly costs before going live:
Cost per run × expected runs per day × 30 - Failure emails are throttled: For published workflows, Langdock sends at most one failure email per hour. After that, the next one only arrives once a run has succeeded in between. A quiet inbox therefore does not mean everything is running again – for a persistently broken workflow, the run history remains the reliable source.
- CSV export of API costs since April 2026: Admin usage can now be exported as CSV – ideal for internal cost reports, chargebacks per team/cost centre, or reconciling against the workspace budget.
Limits
| Limit Type | Behavior |
|---|---|
| Monthly per workflow | New runs are blocked once the limit is reached. Built-in alerts at 80% and 95% of the monthly limit – not to be confused with the 50/90/100% of the workspace spend limit further below. Default for new workflows: 25 USD/month. Scheduled and polling workflows are deactivated the next time they try to run after the limit is hit – they do not restart by themselves once the month rolls over |
| Per-Execution | Individual run is stopped (prevents loop/retry escalation) |
| Execution steps | Max. 2,000 steps per workflow execution. Protects against runaway loops |
| Hourly (Rate Limit) | Max Executions Per Hour – set per workflow. Protects against trigger storms, especially for webhook-triggered workflows. Since September 2026 up to 5,000 runs per hour can be configured, up from a previous ceiling of 1,000 |
| Alert Thresholds | Custom amounts with configurable recipients |
| Monthly Run Limit | Workspace-wide ceiling on the number of workflow executions per month, based on your plan. Applies independently of the budget – a workflow with no AI cost at all still counts |
| Data volume per node | Stored node output max. 25 MB, combined input into a Code Node max. 5 MiB, webhook request body max. 25 MB – an execution limit, not a cost limit |
Workspace admin control (Settings → Workflows):
- Workspace spend limit: Organization-wide monthly cap for all workflow AI usage. Default €500, max €100,000. Admins get an in-app notice and an email at 50%, 90%, and 100%; once the cap is hit, every execution that needs an AI model stops. Trial workspaces track this cumulatively across their whole lifetime, all other plans per calendar month
- Default monthly limit per workflow: Default for new workflows (1–10,000 USD, default 25 USD)
- Maximum monthly limit per workflow: Ceiling (1–10,000 USD) individual workflow settings cannot exceed. If you lower it later, existing workflow limits above the new ceiling are pulled down automatically – a workflow set generously before will run against the tighter limit from then on
- Code Node toggle: Admins can disable custom JavaScript execution workspace-wide
- HTTP Node toggle: Admins can disable external API calls workspace-wide
What does not count against the workflow budget
- Workflow runs are not part of the chat and agent budgets: The spend limits under Settings → Usage (workspace, plan, group, individual extra budget) cover chat and agent usage plus personal API keys. Workflow runs, backbone model usage and workspace API keys stay outside – workflows have their own budget under Settings → Workflows. Watch only the Usage area and you simply will not see workflow cost.
- The Workflow Builder chat is on you personally: Messages in the builder chat count against your personal usage limit (fair use), not against the workflow spend limit. Experimenting in chat does not eat into the budget the production workflow needs.
- Analytics figures and the limit counter are two different things: Cost figures in workflow analytics reflect the date range you pick there. The spend limit counts cumulatively across the whole lifetime in trial workspaces and per calendar month otherwise – while the Billing month dates shown in settings can follow your billing cycle. The three numbers are allowed to diverge without anything being broken.
10 Workflow Blueprints for Real-World Use
▼Blueprint 1: Customer Feedback Processing
Form Trigger
→ Agent: Analyze sentiment, category, priority (Structured Output)
→ Condition: Priority = "high"?
  ├─ Yes → Notification: Notify team
  │       → Action: Slack message to #support
  └─ No → (continue)
→ Action: Add row to Google Sheets
Cost estimate: ~€0.05 per submission (one Agent call)
Blueprint 2: Email Triage & Auto-Routing
Gmail Trigger (new email in support inbox)
→ Agent: Categorize issue, assess urgency (Structured Output)
→ Condition: Check category
  ├─ "Technical Issue" → Action: Create Jira ticket
  ├─ "Sales Inquiry" → Action: Slack DM to sales team
  ├─ "Billing Question" → Action: Forward to accounting
  └─ "Other" → Notification: Inform manager
→ Action: Set label in Gmail
Blueprint 3: Weekly Automated Report
Scheduled Trigger (Monday 8:00 AM)
→ HTTP Request: Fetch sales data from CRM
→ HTTP Request: Fetch support tickets from Jira
→ Code: Calculate KPIs (revenue, ticket volume, conversion rate)
→ Agent: Generate executive summary
→ Action: Email report to management team
→ Action: Save report to Google Drive
Blueprint 4: Application Screening
Form Trigger (Application)
→ Agent: Analyze resume, extract skills (Structured Output)
→ File Search: Find job description in Knowledge Folder
→ Agent: Calculate fit score (0-100) based on requirements vs. profile
→ Condition: Check score
  ├─ ≥ 80 → Action: Send interview invitation via email
  ├─ 50-79 → Action: Add to shortlist sheet + notify HR
  └─ < 50 → Action: Send friendly rejection via email
→ Action: Log all data in recruiting sheetBlueprint 5: Content Pipeline
Notion Trigger (new content entry with status "Draft")
→ Agent: Analyze briefing, extract SEO keywords
→ Web Search: Research competitor content on this topic
→ Agent: Create content outline with USPs and keywords
→ Guardrails: Check brand voice + tone
→ Action: Write outline to Notion page
→ Notification: Notify content manager
Blueprint 6: Qualifying Quote Requests
Form Trigger (Quote Request)
→ Web Search: Research company profile (size, industry, news)
→ Agent: Lead scoring (hot/warm/cold) + reasoning (Structured Output)
→ Condition: Check score
  ├─ "hot" → Action: Slack alert to senior sales
  │          → Action: Send scheduling link via email
  ├─ "warm" → Action: Add to pipeline sheet
  │           → Action: Send nurturing email
  └─ "cold" → Action: Send standard info via email
→ Action: Create CRM entry
Blueprint 7: Meeting Preparation
Calendar Trigger (meeting in 1h)
→ Code: Extract attendee emails
→ HTTP Request: Load customer history from CRM
→ File Search: Find relevant documents in Knowledge Folder
→ Agent: Create meeting brief (context, open items, recommendations)
→ Action: Send brief as Slack DM to meeting organizer
Blueprint 8: Internal Knowledge FAQ
Slack Trigger (message in #ask-ai)
→ File Search: Find relevant information in Knowledge Folder
→ Condition: Relevant results found? (Score > 0.5)
  ├─ Yes → Agent: Formulate answer based on search results
  │       → Action: Reply in Slack thread
  └─ No → Action: Reply in Slack: "No info found, escalating"
           → Notification: Inform knowledge manager
Blueprint 9: Invoice Processing with Approval
Gmail Trigger (new invoice)
→ Agent: Extract invoice data (amount, vendor, due date)
→ Guardrails: PII check
→ Condition: Amount > €5,000?
  ├─ Yes → Human in the Loop: Request approval
  │       → Action: Create payment order
  └─ No → Action: Create payment order directly
→ Action: Add entry to accounting sheet
→ Notification: Confirmation to finance team
Blueprint 10: Competitive Monitoring
Scheduled Trigger (daily 7:00 AM)
→ Loop over competitor list
  Variable: competitor
  → Web Search: "{{competitor.name}} news last 24h"
  → Delay: 2 seconds (rate limiting)
→ Agent: Summarize all results and weight by relevance
→ Condition: Relevant news found?
  ├─ Yes → Action: Send summary via Slack to #competitive-intel
  └─ No → (do nothing)
→ Action: Update weekly report in Google SheetsBest Practices & Common Pitfalls
▼The 10 Most Important Best Practices
- Name Nodes clearly. “Analyze Feedback” instead of “Agent 1”. Your future self will thank you – and variables become self-explanatory.
- One workflow = one purpose. Keep workflows focused. Two small workflows are better than one monster workflow that does everything.
- Test each Node individually. Use the Play button on every Node before building further. Catching errors early saves time.
- Always enable Structured Output. For Agent Nodes in workflows, there is no reason not to. Guaranteed format prevents parsing errors in downstream Nodes.
- Manual Mode as the default. Only use Auto and AI Prompt Mode when necessary. Every AI mode call costs credits.
- Plan for error handling. Especially for Scheduled Workflows: add notifications so you are informed when something goes wrong.
- Calculate costs before going live. Especially with loops and frequent triggers, costs can add up quickly. Do the math beforehand.
- Filter early, process late. Conditions before expensive Nodes (Agent, HTTP Request) reduce unnecessary costs.
- Use the draft version for testing. Only publish once everything works. The draft version (v0) is your playground.
- Document complex logic. Add descriptions to Nodes, especially for Code Nodes and nested Condition logic.
Common Pitfalls
Pitfall 1: Auto Mode everywhere
Auto Mode is convenient but consumes AI credits on every run. For a workflow that runs 100 times per day, this adds up quickly. Use Manual Mode for anything that is static or comes directly from variables.
Pitfall 2: Loop without limit
A loop without a max iterations limit over an unknown-size array can lead to cost explosions and timeouts. Always set a realistic limit.
Pitfall 3: No error paths
If an HTTP Request fails and you have not defined an error path, the entire workflow stops without notification. You will only notice when someone asks why nothing happened.
Pitfall 4: Webhook without secret
A publicly accessible webhook can be called by anyone – including bots. In production always use the X-Webhook-Secret header, not query parameters (tokens in URLs end up in logs and browser history).
Pitfall 5: Vague Agent instructions
“Analyze this text” delivers unpredictable results. Be specific: what exactly should be analyzed? What categories exist? What should the result look like?
Pitfall 6: Scheduled Workflows without monitoring
A workflow that runs every morning at 6:00 AM can fail for weeks without anyone noticing. Always add a failure notification.
Pitfall 7: Inputs too large for Agents
Agents work best with focused inputs. Do not send a 50-page document through in its entirety – instead, extract the relevant sections first (e.g., with File Search or Code Node).
Troubleshooting
▼Variable not available
Problem: The desired variable does not appear in autocomplete.
Cause: The Node is not connected, comes after the current Node, or has not been tested yet.
Solution: Make sure the Node producing the variable comes before the consuming Node in the workflow graph. Run a test.
Variable is undefined or null
Problem: Variable exists but returns undefined or null.
Cause: The source Node failed, the field does not exist, or optional data was not provided.
Solution in Code Node:
const email = trigger.output.email || "unknown@example.com";
const amount = trigger.output.amount || 0;
Agent delivers unexpected results
Problem: Structured Output has unexpected values.
Solution: Check the Output Tab of the Agent Node after the test run. Sharpen the instructions, add examples, and explicitly constrain the possible values.
Workflow does not run on schedule
Checklist:
- Is the workflow deployed (not in draft)?
- Is the workflow active (not paused)?
- Is the time zone correct?
- Is the cron expression correct?
Integration trigger or action stops responding
Problem: An integration trigger no longer fires, or an integration action fails with an auth error.
Cause: The connected app’s access token has expired or been revoked.
Solution (June 2026): You can now re-authenticate existing integrations directly from the connection settings – without removing and re-adding the connection. Your node configuration in the workflow is preserved.
Workflow does not appear in chat or will not start
Problem: The workflow does not show up in the @ menu, or an agent reports Access Denied mid-conversation.
Check the causes in this order:
- Trigger type: Only Manual, Form, and Scheduled triggers can be called from chat. Webhook and Integration triggers never appear there in the first place.
- Publication: A workflow that exists only as a draft (v0) cannot be called from chat.
- Access: With the @-menu you need access to the workflow yourself. If it is attached as an action on a shared agent, access is only checked at execution time – hence the error mid-conversation. Fix: grant the agent’s users access to the workflow.
- Platform: Workflows cannot be started from the mobile apps.
HTTP Request fails
Checklist:
- Is the URL correct? (including
https://) - Is the HTTP method correct?
- Are authentication headers correct?
- Is the body format valid JSON?
- Tip: Use “Import from cURL” from the API documentation
AI investigation on failures since July 2026: When an HTTP Request Node fails, you can hand the investigation straight to the workflow chat. The assistant receives the request, response and status code and proposes a concrete fix – saving you from digging through raw error payloads.
Reading error messages
Filenames instead of IDs since July 2026: File-related error messages now name the filename rather than an internal ID. When a workflow fails while handling multiple attachments, you can see immediately which file caused the problem instead of matching IDs against the run history.
Restarting several failed runs at once
When a single cause took out a whole series of runs – an expired token, an API that was briefly unreachable – you do not have to touch each run individually. Open Past runs at the bottom of the canvas, set Status to Failed, select up to 20 runs and restart them together via Re-run.
| Option | What happens |
|---|---|
| Continue from the failed step | Completed steps are kept; the run continues on exactly the version it originally started on |
| Re-run from the start | The run starts over with the original trigger data – on the latest deployed version, or on the saved draft if nothing is deployed |
Either way: unpublished canvas changes are not used. If you just fixed the bug in your draft, deploy first and restart afterwards – otherwise the retry runs into the very same error.
Every retry is traceable since September 2026: In the run history a restarted run carries the clickable reference Re-run of Run #N. That gets you from any retry back to the original run and its trigger data, instead of guessing which entry in a list of look-alikes was the source.
Tracking down intermittent failures: export the run history since August 2026
Problem: A workflow does not fail every time, just sometimes. You cannot reconstruct that in the editor because the cause is buried among hundreds of runs.
Solution: The Workflow Run Export API returns runs and individual node executions as JSON – one row per node execution, with run status, trigger mode, workflow version, node type, failure code plus input, output and logs. That lets you count failure rates per node, compare durations and spot patterns that stay invisible in a single run.
curl "https://api.langdock.com/workflows/<workflowId>/runs?from=2026-08-01&to=2026-08-31" \
-H "Authorization: Bearer <WORKSPACE_API_KEY>"- Key: a workspace API key with the
WORKFLOW_APIscope (workspace settings → Products → API). Personal API keys only cover the Completion APIs and do not work here. - Access: the key must belong to an owner or editor of the workflow; workspace admins get access without a share. The User role is not enough – not even for admins.
- Date range:
fromandtoare mandatory (ISO 8601). Date-only values run from 00:00:00.000 to 23:59:59.999 UTC; a timestamp without a timezone is read in the server's timezone – so passZor an explicit offset. - Limits: at most 10,000 runs and 8,000,000 bytes of payload per request, otherwise
400withWORKFLOW_RUN_EXPORT_LIMIT_EXCEEDEDorWORKFLOW_RUN_EXPORT_TOO_LARGE. There is no pagination – a narrower date range is always the answer. Rate limit: 500 requests per minute per workspace and key. - Retention:
inputandoutputarenullafter 30 days. If you want to analyse further back, export regularly rather than retroactively. Individual values above 16,000 bytes arrive truncated, marked by a_truncatedobject. - Empty payloads: when
data_redactedistrue, you lack access to one of the nodes involved – often an Action or Agent Node. In that case the run is not broken, the sharing is.
On dedicated deployments, https://<your-domain>/api/public replaces api.langdock.com. Langdock deliberately blocks browser-origin requests – the export belongs in a backend or a script, not in a web app.
Glossary
▼| Term | Definition |
|---|---|
| Node | An individual step/building block in a workflow |
| Trigger | The starting point of a workflow (Form, Webhook, Schedule, Integration, Manual) |
| Connection | Line between Nodes that defines execution order |
| Variable | Data passed from one Node to downstream Nodes |
| Structured Output | Defined JSON schema for Agent responses |
| Field Mode | How a configuration field is populated (Auto, Manual, AI Prompt) |
| Guardrail | AI-powered validation check for content |
| Human in the Loop | Manual approval step in a workflow |
| Draft (v0) | Draft version for testing, not active in production |
| Deploy | Publishing a tested version as a production version |
| Loop | Iteration over an array/list of elements |
| RAG | Retrieval Augmented Generation – enriching AI responses with knowledge search |
| Webhook | HTTP endpoint that external systems can call |
| MCP server | Externally connected tool server whose actions can be used in a workflow like an integration |
| Subgraph | A connected sub-flow of several nodes that can be selected via Shift-click and copied along with its connections |
| Sticky note | Canvas annotation (Markdown, colour presets) for documentation – without affecting execution |
| Rate Limiting | Restricting the frequency of API requests |
| Error Callback | Alternative execution path when a Node fails |
| Output Node | Endpoint node that stores the workflow result and displays it as a panel in chat integration |